Coffee cupping, also known as coffee tasting, is a standardized process used by coffee professionals and enthusiasts to evaluate the quality, flavor, and aroma of coffee. Whether you’re a coffee roaster, barista, or just a coffee lover, cupping is an essential skill to develop your palate and better understand the nuances of different coffee beans.
In this step-by-step tutorial, we’ll guide you through the coffee cupping process, from preparation to evaluation, so you can confidently taste and assess coffee like a pro.
What is Coffee Cupping?
Coffee cupping is a methodical process of brewing and tasting coffee to evaluate its flavor profile, aroma, body, acidity, and aftertaste. It’s widely used in the coffee industry to assess the quality of beans, compare different origins, and identify defects.
The process involves brewing coffee in a controlled environment, using specific ratios and techniques to ensure consistency. By following a structured approach, you can focus on the unique characteristics of each coffee.
Why is Coffee Cupping Important?
- Understand Flavor Profiles: Cupping helps identify the unique flavors and aromas of coffee beans from different regions.
- Quality Control: Roasters and producers use cupping to ensure the beans meet quality standards.
- Compare Coffees: It’s an excellent way to compare different origins, roast levels, or processing methods.
- Develop Your Palate: Regular cupping sharpens your ability to detect subtle flavors and aromas.
What You’ll Need for Coffee Cupping
Before you begin, gather the following tools and materials:
Equipment:
- Freshly roasted coffee beans (preferably whole beans)
- Grinder (burr grinder for consistent grind size)
- Cupping bowls (or any small, heat-resistant bowls)
- Cupping spoons (deep, rounded spoons for tasting)
- Kettle (for heating water)
- Scale (to measure coffee and water accurately)
- Timer (to track brewing time)
Other Essentials:
- Hot water (filtered, heated to 93°C or 200°F)
- Tasting notes sheet or notebook
- Clean water for rinsing spoons
- Napkins or towels
Step-by-Step Coffee Cupping Tutorial
Follow these steps to conduct a proper coffee cupping session:
Step 1: Prepare the Coffee
- Weigh the Coffee: Use 8.25 grams of coffee per 150 ml (5 oz) of water. This is the standard ratio for cupping.
- Grind the Coffee: Grind the beans to a coarse consistency, similar to sea salt. Ensure all samples are ground to the same size for consistency.
- Label the Bowls: If you’re cupping multiple coffees, label each bowl to keep track of the samples.
Step 2: Smell the Dry Grounds
- Place the ground coffee in the cupping bowls.
- Gently shake the bowl to level the grounds.
- Smell the dry grounds and take note of the aroma. Look for hints of sweetness, fruitiness, nuttiness, or other distinct scents.
Step 3: Add Hot Water
- Heat the water to 93°C (200°F).
- Pour the water over the grounds in each bowl, filling them evenly. Use a timer to track the brewing process.
- Let the coffee steep for 4 minutes. During this time, the coffee grounds will form a crust on the surface.
Step 4: Smell the Wet Grounds
- After 4 minutes, smell the wet grounds. The crust traps aromatic compounds, so this is a great time to evaluate the coffee’s aroma.
- Take note of any changes in the aroma compared to the dry grounds.
Step 5: Break the Crust
- Use a cupping spoon to gently break the crust by stirring the surface of the coffee.
- As you break the crust, lean in and smell the released aromas. This is one of the most important steps in cupping.
- Rinse your spoon after breaking each crust to avoid cross-contamination.
Step 6: Remove the Grounds
- After breaking the crust, use two spoons to skim off the remaining grounds and foam from the surface of the coffee.
- Discard the grounds into a separate container.
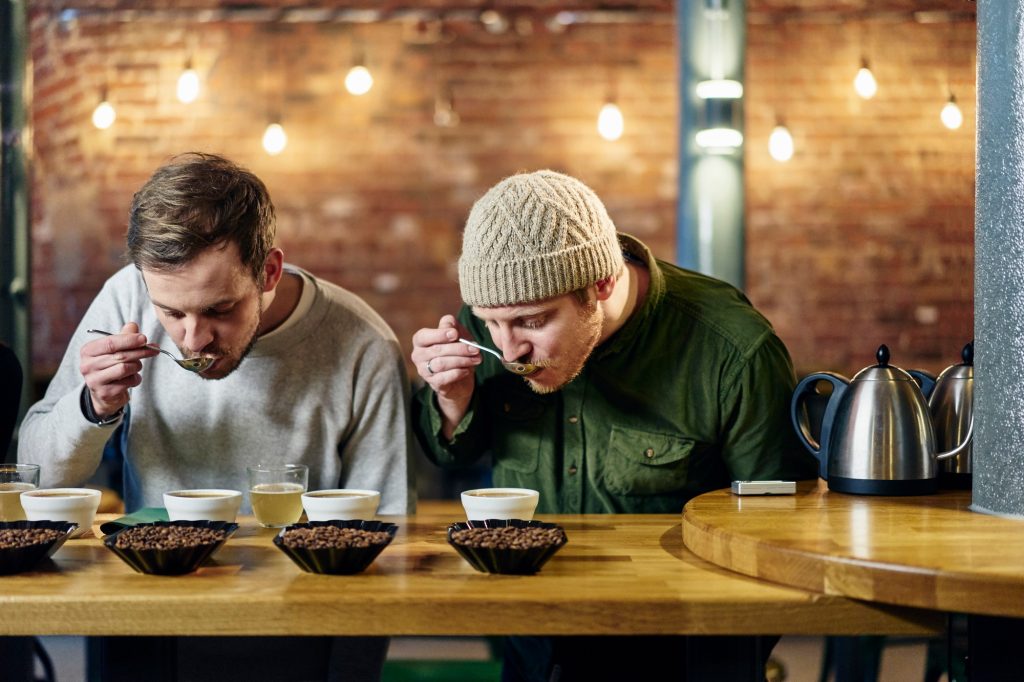
Step 7: Taste the Coffee
- Allow the coffee to cool slightly (to around 60°C or 140°F) before tasting. This makes it easier to detect flavors.
- Use your cupping spoon to scoop a small amount of coffee.
- Slurp the Coffee: Slurp the coffee loudly to aerate it and spread it across your palate. This enhances your ability to detect flavors.
- Take note of the coffee’s flavor, body, acidity, sweetness, and aftertaste.
Step 8: Evaluate and Take Notes
- Use a tasting sheet or notebook to record your observations.
- Focus on the following attributes:
- Aroma: What scents do you detect?
- Flavor: What flavors stand out? (e.g., fruity, nutty, chocolatey)
- Acidity: Is the acidity bright, mild, or sharp?
- Body: How does the coffee feel in your mouth? (e.g., light, medium, full)
- Aftertaste: Does the flavor linger? Is it pleasant or bitter?
Tips for Successful Coffee Cupping
- Use Fresh Coffee: Always use freshly roasted coffee for the best results. Ideally, the beans should be 3–10 days post-roast.
- Stay Consistent: Use the same grind size, water temperature, and steeping time for all samples.
- Avoid Bias: If you’re cupping multiple coffees, consider doing a blind tasting to avoid preconceived notions.
- Practice Regularly: The more you cup, the better you’ll become at identifying subtle differences in coffee.
Common Flavor Notes in Coffee
Here are some common flavor notes you might encounter during cupping:
- Fruity: Citrus, berry, apple, tropical fruits
- Sweet: Caramel, honey, chocolate, brown sugar
- Nutty: Almond, hazelnut, peanut
- Floral: Jasmine, lavender, rose
- Spicy: Cinnamon, clove, black pepper
Why Coffee Cupping is Worth It
Coffee cupping is more than just a tasting exercise—it’s a journey into the world of coffee. By learning to identify and appreciate the unique characteristics of each coffee, you’ll deepen your understanding and love for this incredible beverage. Whether you’re a professional or a home enthusiast, cupping is an invaluable skill that will elevate your coffee experience.
Schedule Your Free Coffee Cupping Session
Ready to experience coffee cupping firsthand? Schedule a free coffee cupping session with us at Daily Grind Roastery. Discover the unique flavors of our expertly roasted beans and learn how to evaluate coffee like a pro!
Coffee cupping is a rewarding practice that allows you to explore the depth and complexity of coffee. By following this step-by-step tutorial, you’ll gain the skills and confidence to evaluate coffee like a professional. So grab your tools, brew some coffee, and start your cupping journey today!